Skip to content
Q is For Quilter
Menu
  • Quilts
  • Quilt Patterns
  • Embroidery
  • Embroidery Patterns
  • WIPs
  • Children’s Books
  • Aprons
  • Other Needlework
  • Crafts
  • Vintage Finds
Menu

Embroidered Place Cards

Posted on June 29, 2015March 1, 2016 by Martha

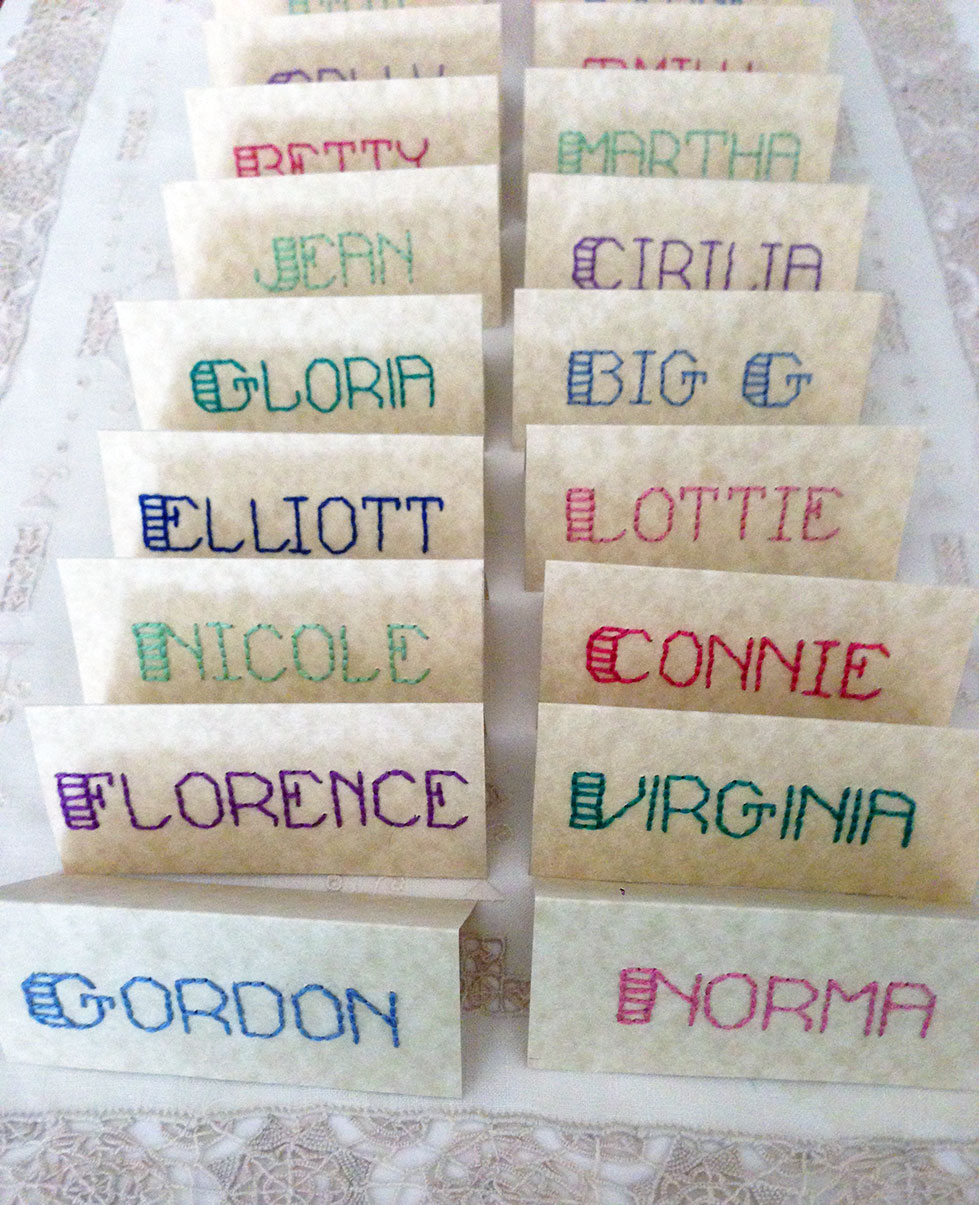
Here’s a little project for my mother-in-law’s upcoming 86th birthday. It’s easy and fun to do, and reminds me of stitching sewing cards when I was little.

Stitched-Placecards

Select an Alphabet
I used an old Leisure Arts booklet (20 Backstitch Alphabets, Mini Series #2). You could also use a font. These instructions are for working with a block type alphabet that will line up with a grid.

Draw the Names on Grid Paper
Pick a grid size that will work with your place card size (I used 1/10th inch). You might have to adapt the design to fit the front of your place card (some of my I letters are narrower than others). Make your lines fairly dark so you will be able to see them through the cardstock.

Cut your Cardstock into Place cards
My placecards are 4 1/4″ wide x 4″, cut from legal size cardstock with a parchment design. They will be folded in half after stitching.

Copy the Dots onto your Cards
Use a light box of some sort and position your card over your drawing. Make sure you copy the dots to the bottom half of the card, which will be the front. Place a tiny pencil dot at each point you want to insert your needle.

Punch Holes in your Cards
Using an embroidery needle, poke small holes in each dot.

Stitch your Names
Use perle cotton, floss, or any similar thread to stitch the names in back stitch. Fold the card in half so it will stand on its own.

Moving on now to making crepe paper flowers, which will serve as both the centerpieces and party favors.

8 thoughts on “Embroidered Place Cards”

  1. Little Penpen says:
    June 29, 2015 at 3:22 pm

    Such a cute idea! And they must have been so much fun to make!

    Reply
  2. Sandy says:
    June 29, 2015 at 5:29 pm

    What a wonderful idea! We use place cards when we have Thanksgiving dinner at my house. It started as a project for the grandkids and became a tradition!

    Reply
  3. Mallika says:
    June 29, 2015 at 10:03 pm

    You must have had fun doing them. A good idea. I think I’ll try this when I have a party for my dad who turned 81 a couple of days back. He wants to have a party when my sis is back in town in a week’s time.
    Thankyou for sharing the idea and the technique doing this.

    Reply
  4. Robin in KS says:
    June 30, 2015 at 10:09 am

    Clever idea! I’m adding this to my list of things to try.

    Reply
  5. Patty says:
    July 1, 2015 at 10:35 am

    I think they would make wonderful bookmarks after the party. Too beautiful not to keep using!

    Reply
  6. Roxanne says:
    July 4, 2015 at 10:27 am

    Love the place cards, such a special touch.

    Reply
  7. Tina says:
    July 6, 2015 at 6:24 am

    Happy Birthday to your mom! I am looking forward to seeing what you do with the flowers and decorations.

    Reply
  8. Sharrieboberry says:
    July 8, 2015 at 2:01 pm

    Happy birthday to your MIL! These are lovely.

    Reply

Leave a Comment Cancel reply

Your email address will not be published. Required fields are marked *

A small blog about Martha's quilting hobby.

More About Me

Popular Posts

Categories

  • Quilts
  • Quilt Patterns
  • Embroidery
  • Embroidery Patterns
  • WIPs
  • Children’s Books
  • Aprons
  • Other Needlework
  • Crafts
  • Vintage Finds

Archives

  • October 2017
  • September 2017
  • August 2017
  • July 2017
  • June 2017
  • May 2017
  • December 2016
  • October 2016
  • September 2016
  • August 2016
  • July 2016
  • June 2016
  • May 2016
  • April 2016
  • March 2016
  • February 2016
  • January 2016
  • December 2015
  • November 2015
  • October 2015
  • September 2015
  • August 2015
  • July 2015
  • June 2015
  • May 2015
  • April 2015
  • March 2015
  • February 2015
  • January 2015
  • December 2014
  • November 2014
  • October 2014
  • September 2014
  • August 2014
  • July 2014
  • June 2014
  • May 2014
  • April 2014
  • March 2014
  • February 2014
  • January 2014
  • November 2013
  • October 2013
  • September 2013
  • August 2013
  • July 2013
  • June 2013
  • May 2013
  • April 2013
  • March 2013
  • February 2013
  • January 2013
  • December 2012
  • November 2012
  • October 2012
  • September 2012
  • August 2012
  • July 2012
  • June 2012
  • May 2012
  • April 2012
  • March 2012
  • February 2012
  • January 2012
  • December 2011
  • November 2011
  • October 2011
  • September 2011
  • August 2011
  • July 2011
  • June 2011
  • May 2011
  • April 2011
  • March 2011
  • February 2011
  • January 2011
  • December 2010
  • November 2010
  • October 2010
  • September 2010
  • August 2010
  • July 2010
  • June 2010
  • May 2010
  • April 2010
  • March 2010
  • February 2010
  • January 2010
  • December 2009
  • November 2009
  • October 2009
  • September 2009
  • August 2009
  • July 2009
  • June 2009
  • May 2009
  • April 2009
  • March 2009
  • February 2009
  • January 2009
  • December 2008

Search

© 2025 Q is For Quilter | Powered by Minimalist Blog WordPress Theme