Skip to content
Q is For Quilter
Menu
  • Quilts
  • Quilt Patterns
  • Embroidery
  • Embroidery Patterns
  • WIPs
  • Children’s Books
  • Aprons
  • Other Needlework
  • Crafts
  • Vintage Finds
Menu

Paint-by-Number Paris Street Scene – DIY

Posted on October 24, 2013August 2, 2015 by Martha

First of all, I want to thank everyone who made a comment on my Flower Garden Quilt Quandary. After reading all the comments (most of which politely suggested that I am crazy to take this quilt apart), and looking over the quilt again, I have decided to keep the set the way the quilter intended. I evened up the edges, and will add the flowers I removed, together with about 20 I’ll need to sew from vintage fabric, to make the quilt two rows wider.  Thank you so much for your great advice.

Now to the paint-by-number I’ve been working on all this week.

Paint-by-number kits were very popular when I was young, and I really wanted one, being someone who liked coloring books and was generally a “stay-in-the-lines” type of colorer. Unfortunately, I was a little too young, and it was my older sister who got the cool oil paint set in the real wood case, as well as a paint-by-number kit. Neither of us remember what the picture was, but I definitely remember being envious.

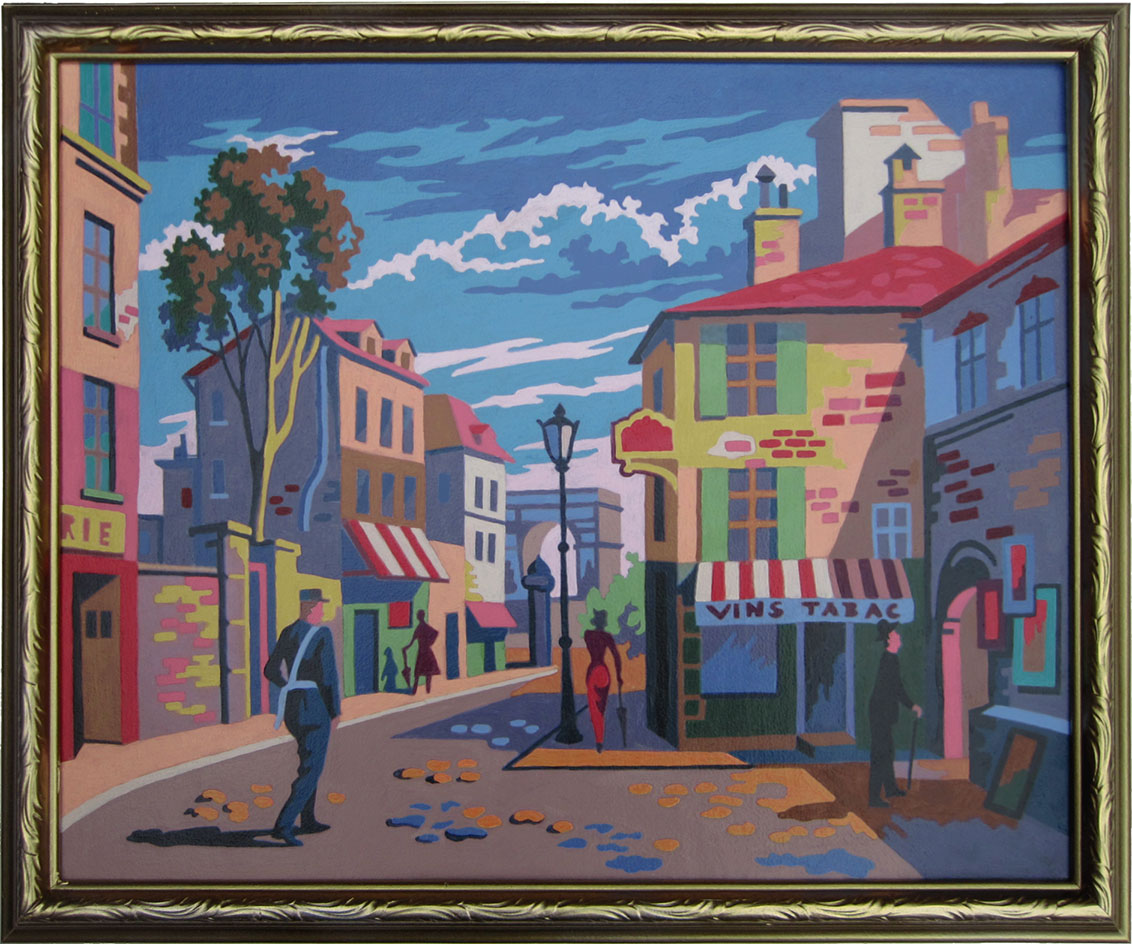
So, last week on Etsy there was this great paint-by-number picture from a kit produced in 1953, but I didn’t want to buy it — I wanted to paint it.  And I figured out a way to do it.

Paint-by-Number Reproduction
Palmer Paints, Inc., 1953
Suburb De Paris
Martha Dellasega Gray, 2013
paint-by-number-paris-street-scene

Here’s what I did:

  • Enlarged and straightened the picture in Photoshop (mine is about 18″ x 20″)
  • Saved it as a Photoshop pdf and tile printed it in Acrobat on a color laser printer
  • Trimmed the pages and carefully Mod-Podged them to a piece of foam board – let dry
  • Brushed several more layers of Mod-Podge on top of the picture – let dry
  • Lightly sanded the Mod-Podge which made the paint stick better
  • Used acrylic paints and small to medium brushes to paint in the colors
  • Brushed another layer of Mod-Podge over the finished painting
  • Went to Goodwill and got a cheap frame which I cut down and spray painted
  • Hung up my new picture

Of course, there are no numbers in my technique — I just tried to match the colors on the image.  Seriously, this was a lot of fun, and I found a photo of a companion painting that is just as cute, but has the Eiffel Tower in it.

8 thoughts on “Paint-by-Number Paris Street Scene – DIY”

  1. Jan says:
    October 24, 2013 at 9:20 pm

    Martha, you amaze me with your ideas! It looks fabulous!

    Reply
  2. Shelley Germann says:
    October 25, 2013 at 9:07 am

    Not only are you amazing with the needle but with computer! You are one smart cookie! What a great idea!

    Reply
  3. Penny says:
    October 25, 2013 at 2:06 pm

    This is awesome!! What a great idea!

    Reply
  4. Jane S. says:
    October 25, 2013 at 7:03 pm

    Now that’s clever! Heck you could paint nearly anything, doing it that way. What an excellent idea. 🙂

    Reply
  5. Tina says:
    October 26, 2013 at 4:47 am

    You are masterful at so many arts, crafts and technological endeavors!

    Reply
  6. Karen Beigh says:
    October 26, 2013 at 10:27 am

    I think a quilt made from this design would be wonderful. You can do it!

    Reply
  7. Diane Harris says:
    November 4, 2013 at 8:50 am

    I love it. You are multi-talented if you could just cut down the frame with ease. I must expand my skills!

    Reply
  8. Kelly says:
    December 28, 2013 at 1:27 pm

    Wonderful! I am going to give it a go. I want a collection of paint by numbers in my livingroom! Thank you for the inspiration. ~Kelly

    Reply

Leave a Comment Cancel reply

Your email address will not be published. Required fields are marked *

A small blog about Martha's quilting hobby.

More About Me

Popular Posts

Categories

  • Quilts
  • Quilt Patterns
  • Embroidery
  • Embroidery Patterns
  • WIPs
  • Children’s Books
  • Aprons
  • Other Needlework
  • Crafts
  • Vintage Finds

Archives

  • October 2017
  • September 2017
  • August 2017
  • July 2017
  • June 2017
  • May 2017
  • December 2016
  • October 2016
  • September 2016
  • August 2016
  • July 2016
  • June 2016
  • May 2016
  • April 2016
  • March 2016
  • February 2016
  • January 2016
  • December 2015
  • November 2015
  • October 2015
  • September 2015
  • August 2015
  • July 2015
  • June 2015
  • May 2015
  • April 2015
  • March 2015
  • February 2015
  • January 2015
  • December 2014
  • November 2014
  • October 2014
  • September 2014
  • August 2014
  • July 2014
  • June 2014
  • May 2014
  • April 2014
  • March 2014
  • February 2014
  • January 2014
  • November 2013
  • October 2013
  • September 2013
  • August 2013
  • July 2013
  • June 2013
  • May 2013
  • April 2013
  • March 2013
  • February 2013
  • January 2013
  • December 2012
  • November 2012
  • October 2012
  • September 2012
  • August 2012
  • July 2012
  • June 2012
  • May 2012
  • April 2012
  • March 2012
  • February 2012
  • January 2012
  • December 2011
  • November 2011
  • October 2011
  • September 2011
  • August 2011
  • July 2011
  • June 2011
  • May 2011
  • April 2011
  • March 2011
  • February 2011
  • January 2011
  • December 2010
  • November 2010
  • October 2010
  • September 2010
  • August 2010
  • July 2010
  • June 2010
  • May 2010
  • April 2010
  • March 2010
  • February 2010
  • January 2010
  • December 2009
  • November 2009
  • October 2009
  • September 2009
  • August 2009
  • July 2009
  • June 2009
  • May 2009
  • April 2009
  • March 2009
  • February 2009
  • January 2009
  • December 2008

Search

© 2025 Q is For Quilter | Powered by Minimalist Blog WordPress Theme