This is a continuation of a previous tutorial. Please refer to part 1 of this tutorial for general directions which are not included here.
SIMPLE PUFFY FLOWER – FANCY EDGE
An easy variation of the Simple Puffy Flower in part 1 that can be done with any craft scissor. With your 12′ length of streamer, fold in half until the length is approximately 9″. Secure one side with clips and use craft scissors to cut an edge design on the opposite side.

Fold the streamer in half and feed the double thickness through the ruffler on stitch width 3. Pull the two layers apart to make the flower puffier. Attach the ruffled streamer to the double-stick tape and wrap around the wire. Hot glue the end and add the calyx and tape.

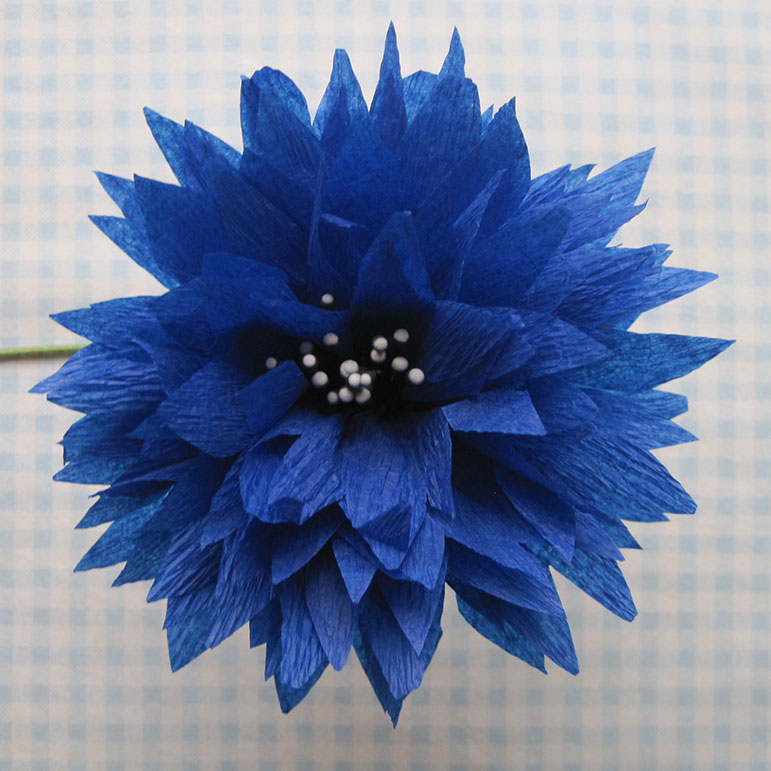
CORNFLOWER
There aren’t a lot of blue flowers, but I have 3 shades of blue streamers, so I really wanted to figure out some kind of flower pattern. I’m pretty happy with the cornflower design, but I would probably use this piece to make two flowers if I were doing it again. A 12′ streamer makes a giant cornflower.
Cut the usual 12′ length and fold to 9″. You might want to draw this pattern on the crepe paper before cutting.

Unfold the the streamer and run the single layer through the ruffler using a smaller stitch, and adjust the screw on your ruffler to make a smaller pleat. Go slow, and be careful not to catch the petals in the foot. Black stamens are nice on this one, and if you don’t have any you can make some by making narrow cuts into a little piece of black crepe paper (like the mum in part 1) and then wrapping it around the wire before attaching your flower petals.

The next three flowers are made with duplex streamers. To make these, cut two 6′ lengths of streamer, lay one piece on some newspaper and spray lightly with adhesive. Carefully place the second streamer on top of the first and press flat with your hands. I think it’s easiest to do this in 2 or 3 sections rather than trying to spray the whole 6′ at once. You can also iron the streamer after gluing which seems to make it stick a little better.
These duplex designs don’t need much ruffling, so keep the stitch width a bit shorter, and adjust the screw on your ruffler to make a smaller pleat. You can experiment to see what works best — you want to give the petals some dimension without losing their outline. The process for putting them together is just like all the rest.
A SORT OF ROSE
Okay, it’s not as cool as the roses made with individual petals, but I think it’s cute. Fold the streamer to 9″ and cut as shown.


POPPY
Again, not quite as nice as the poppy with individual petals made with Italian crepe paper where you can do that little ruffly thing on the edges of the petals, but this one is pretty nice and way easier.

This flower is another one that looks good with black stamens.

DAISY
Made just like the daisy in Part 1, but this one has fewer, thicker petals. I know I’ve mentioned this before, but I get bored easily, so I am always looking for any little variation to keep me inspired.


Please use the comment box to ask any questions, and I’ll be happy to respond. Also, if anyone actually uses this tutorial to make a flower, I would love to hear from you.
Every time I think I had a favorite, I liked the next one even better. I could look at these all day. Have you even done poinsettias for Christmas?
A little like cutting snowflakes but so much more beautiful…Thank yo for the tut…smiles..Renee
Great use of those small clips and your flowers are gorgeous! Thanks for sharing the turorials.
i will make them soon!!they are so easy and beautiful!the method i know takes nearly an hour to make one flower.these are amazing.
What is a ruffler?
Amazing creativity! just brilliant:) thanks!
Thanks so much its very nice
wow that’s amazing and easy, thanks for the tutorial ^-^ <3
Can these be made without a ruffler foot? If so, what do you recommend? I’d love to make these for my wedding bouquet.
Thanks for sharing the pattern for these beautiful flowers, they are charming.
Wow. Lovely blooms! ….. Um… What’s a ‘Ruffler’? (I’m very new to all this). …and are there any photos showing how you turned the strips into the flowers please?
Thanks
Thanks Kaye — If you click the link to Part 1 of this tutorial (at the top of the page), you will see a photo showing the ruffler foot, as well as a link to a YouTube video showing how to use the foot.
wonderful flowers!