
I’m not dead! It’s been six months since I’ve posted anything, and I must say that it’s very hard to get back into the routine of posting after you’ve taken a long break. Gordon and I spent about four months arranging new housing for his parents (independent and assisted living), as well as cleaning out, repairing and selling their home of 60+ years. Also, Gordon has finally retired, so we are doing more things together during the day, which means I am spending less time sewing.
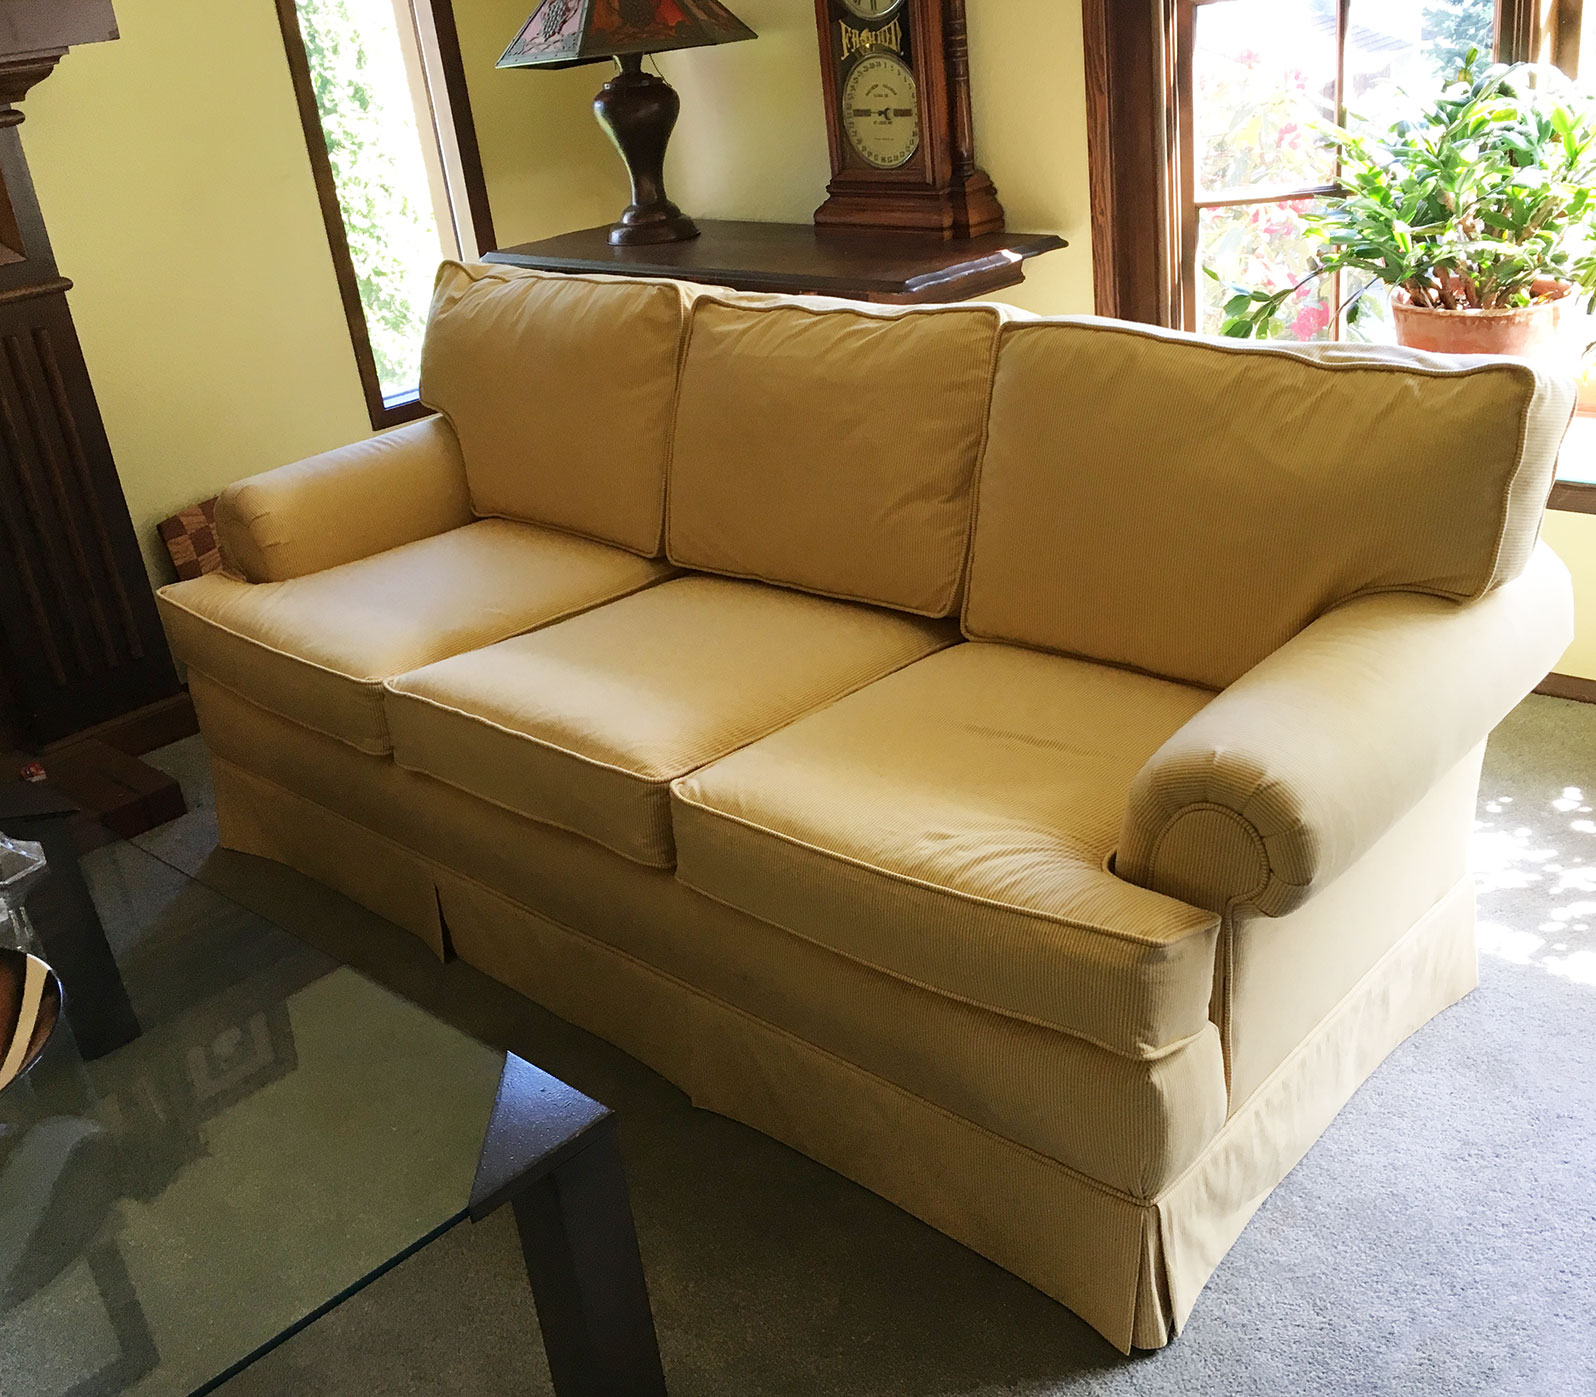
Some of my break was spent reupholstering furniture, which has been a challenging but satisfying project. We purchased our living room couch when we moved into this house 26 years ago. It’s a Lane in a traditional style that was originally covered in blue brocade (I know . . . ick), but it was a subtle pattern and I liked it for a long time until I didn’t. Although the couch itself was still in great shape, the fabric was really gross. Our dog, Lucy, used to sneak in and sleep on it when no one was home, and also it was faded from the sun. My sister gave me a bolt of yellow striped cotton which she decided not to use for her couch, so this project was practically free.
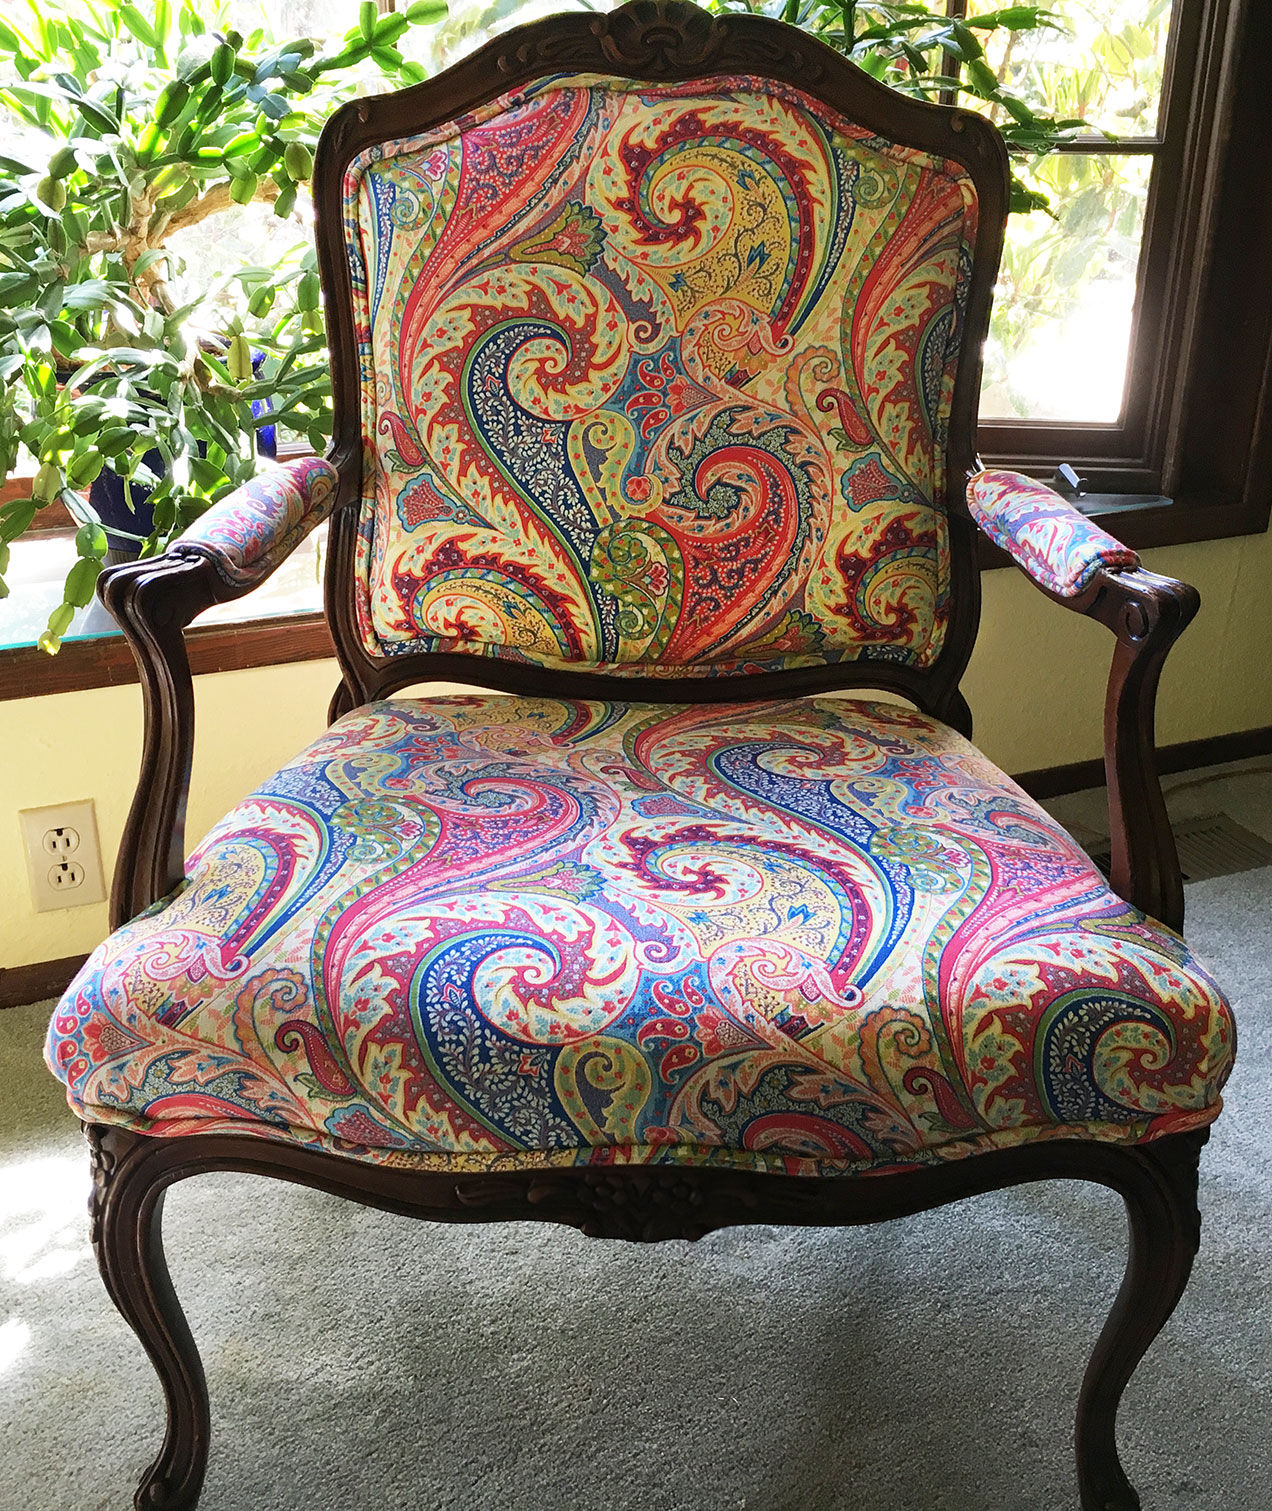
I am also recovering two matching chairs purchased from a thrift shop about the same time as the couch — one of which is finished, and the other is in progress. They’re a sort of French style, with carved wood frames, and fabric covered seats, backs and arms. Double welting covers the stapled edges.
My sister, who taught herself how to upholster, helped me with my first piece, and I’ve since done three others. This couch, however, is the most elaborate job I’ve tackled. There was more sewing involved because it has six cushions, four of which are odd shapes, but most of the project involved staples — tons of staples. I feel like there were thousands in these three pieces, which I saved in a bowl to prove to Gordon how hard I’d worked. It’s insane how many staples these professional upholsterers use — I always think they go crazy just because they can, since they’re using easy, expensive pneumatic staple guns.
There are lots of good tutorials online for learning to do upholstery (I like this one at diydesign), and even though they’re not going to be quite the same as your piece, they can still be very helpful. For the couch, I started at the bottom and just began peeling off each section, keeping the pieces intact that I would need as templates for the new pattern. I marked all the pieces with a black sharpie, making note of placement, direction, seam allowances, tucks — basically anything I could think of that would help me get the thing back together. I also tried to preserve all the little tricky devices they use (some metal, some cardboard) so I could reuse them later. Really, it’s just like a big puzzle, and if you take your time, it’s not that difficult. The very worst part is removing all the staples, and I found some new tools that made it much easier this time (shown below).
Here’s the couch while I was working on it — propped up on other furniture, including the chairs I would recover later and a piano bench with a shuffle board on top. It’s much easier on your back if you can rig up something to elevate the piece.

Here’s the finished couch, which I think took about three weeks to recover, but I didn’t work on it every day. The old blue fabric was very snug on the cushions, but I wanted a little softer look. I kept the bottom cushions fairly tight, but made the back cushions a little slouchier.
I thought the chairs were going to be much easier, because the construction was pretty simple. Unfortunately, the staple situation was horrible. The wood was much harder than on the couch, and the staples were butted up against the edge of a sort of channel in the wood which made them very difficult to pry up without gouging the wood.
What saved the day were two staple lifters — C.S. Osborne & Co. No. 763 (red handle) and No. 64006 (yellow handle). I would have given up without these tools. I also used heavy-duty pliers, a light staple gun with 3/16″ wire staples (I can’t squeeze hard enough to use the heavy duty guns, so sometimes I have to use a hammer to get the staples all the way in). As you can see in the photo below, the cotton was a little rough after I peeled it away from the fabric, so I added new pieces of quilt batting to smooth it out.

I love this linen fabric that I found 50% off at Joann’s, but it was only available online and I had to wait 3 weeks to receive it. The double welting on the chair is super easy to prepare, and there are lots of instructional videos on YouTube. The original welting was stapled on, but I always put mine on with hot glue, which works just fine and is much easier.

So, that’s what I’ve been doing. My plan is to post whenever I have something new, but I’m not sure how often that will be.
You’ve been missed Martha but I can imagine how busy you’ve been with family stuff.
And the upholstery looks fab. Love that linen on the chairs!
I’ve had the same lethargy with my blog. It seems to take so much longer than Instagram and,who knows who reads it anyway.
I get very few comments.
Your upholstery work is just beautiful! I think I would have to smile each time I sat down on them! 🙂
You are a woman of many talents! Glad you are back 🙂
Well, Hi! Nice to see you again!
Is there anything you can’t do – what gorgeous finishes! It looks like you’ve been reupholstering your whole life. Love the fabrics too – that soft yellow is so cheery, and the chair fabric really shows off the classic lines of the chair. Congrats to your hubby on his retirement!
Hats off to you! The couch looks terrific and i love the yellow striped fabric……it looks amazing. No matter how often, I love reading what you’ve been up to 🙂
Welcome back Martha! I’ve missed you! The couch and chairs look terrific and I am glad you finally have things settled with the family. I DO hope you get time to sew because you inspire so many of us. Glad you are doing well!
Hugs and hugs, Mickie
So glad you r back! Really missed you…but sure can understand busy with parents..We did that also and it’s a lot of work.
Welcome back! The furniture looks wonderful. I haven’t reupholstered anything for ages. We bought thrift store furniture when we were young and poor and I upholstered it back in the day before there were computers to tell you what to do. I used library books to figure it all out.
It is nice to see you back online. Your work is wonderful. I have a chair half done. Started with the same staple nightmare. Do post as you are able. It is so inspiring to see what you are up to.
So very glad you are back!!!!
Rose
What an awesome project and an awesome post! It sounds like your routine isn’t routine! I’m glad you stopped in to show us your handiwork. Love it!
Hi Martha
You have been missed. The furniture is beautiful, you did an awesome job.
I bought a book 2 yrs ago to teach myself upholstery as I have a chair I want to do. Just seems so expensive to buy tools for 1 project. But I’ll check out the site you mentioned. Thank you and welcome back.
Ive missed you! Amie 🙂
Hi Martha,
Great to see you back . Welcome.
Your work is inspiring. I can’t think of doing this in my country. Upholstering – haven’t heard anyone doing it themselves.. It is always “got done”:) 😀
How I wish I was living closer to you. I could have learnt the lovely things you make.
Good to see you back:)
What a wonderful way to start the day; you’re back. As inspirational as ever and with amazing projects. Chapeau madam, that was quite a size to tackle. Love from Switzerland.
So glad to see you back. Although my life too has been through some major changes I have missed reading your posts.
Your upholstery work is beautiful. I did much the same type of thing many years ago to the couch we had in our first home. I loved a challenge then, not so much now LOL.
Enjoy retirement time with your husband.
Hi Martha,
I’ve been checking in on your blog over the past 6 months in the hopes that you would return. I was surprised and delighted this morning to find that you were back!! I loved reading about your upholstery projects. I always find your go-for-it attitude inspiring. You have unerring taste in picking your fabrics. I especially loved the chair fabric. Who wouldn’t want to sit in that chair?! So thank you for returning to your blog. I hope you will find the time to continue. You have many followers who appreciate your talent and enjoy your writing. I have been reading your blog along with my morning coffee for many years now. I find it a joy and a relief from the news headlines. Thank you Martha!
Beautiful fabrics! Congrats on such a great job
hat chair fabric is just gorgeous! I would love to find a few yards at my JoAnnes. What I really noticed in your picture is your beautiful cats…https://sarkariyojnaapply.com/ the white cat in particular reminds me of my best kitty, Noel Etoile, gone at least 20 years. I still miss her! She was a chinchilla persian and the https://pmyojanadekho.com/ sweetest cat I’ve ever known.
Welcome Back!! So nice to read a new post, your work is just beautiful. It sounds like you’ve been very busy with some important, time-consuming projects. Everything you do is just so inspiring. I will enjoy any posts you choose to publish!
Beth
Oh what a lucky day…..to have found that you have returned to this blog! Like the other comments, I love your enthusiasm, the practical details and the sheer exuberance of your style. Oh, that chair fabric is lovely. Also, the suggestions about elevating the project to spare your spine are just exactly a mirror of my own needs. THANK YOU!
Martha,
That chair fabric is just gorgeous! I would love to find a few yards at my JoAnnes. What I really noticed in your picture is your beautiful cats…the white cat in particular reminds me of my best kitty, Noel Etoile, gone at least 20 years. I still miss her! She was a chinchilla persian and the sweetest cat I’ve ever known.